Are you looking to track your email campaigns? Want to know your email campaign conversion rate? In this guide, I will show you step by step google analytics email tracking. You will learn about UTM parameters, the URL builder tool and the important email marketing metrics to measure.
No matter, if you are familiar with google analytics or not, you can still set up the basic things google analytics email tracking.
First Things First: Setting Up Google Analytics Tracking
If you didn’t use google analytics before, this is the right time to use. It’s totally free and interesting tool when it comes to tracking your email campaigns.
Sign up for a google analytics account and get started with the basic things to set up.
Google Analytics Email Tracking
Tracking email campaigns in google analytics is not a messy thing unless you are pretty familiar with the features. To make this process more understandable and easy to integrate, I have broken down the whole process into 5 steps. Follow the below steps to implement google analytics email tracking.
1. Getting your hands dirty with UTM parameters
UTM(Urchin Tracking Module) code is a simple code that is attached to the actual URL to track visitor information. UTM parameters come handy for email tracking in google analytics. There are five UTM components that can be added to the URL.
utm_source* : Identify the source of traffic i.e google, bing, stackoverflow
utm_medium* : Identify the medium i.e email
utm_campaign* : Identify the specific campaign strategy i.e winter_sale
utm_content : used for A/B testing
utm_term: used for paid search to track keyword
The first three parameters are required for tracking any campaign/URL and the rest are optional. These UTM tags are added at the end of URL by separating with a question mark(?).
2. Embedding UTM parameters in URL
There are two common ways to embed UTM tags in a URL.
1. Adding tags by yourself
Only follow this method if you have practiced enough with UTM tags otherwise you will end up with zero results. Let’s say you are tracking a newsletter email campaign and the actual campaign URL is https://campaigntracking.com
Let’s add the UTM tags to the above URL.
First, add a question mark to separate the url from the tags
https://campaigntracking.com?
Next, enter utm_source tag
https://campaigntracking.com?utm_source=newsletter
To separate the UTM tags, we will use the ‘&’ symbol. Our final URL will be
https://campaigntracking.com?utm_source=newsletter&utm_medium=email&utm_campaign=newsletter_traffic
There aren’t any defined rules to put the UTM tags, so you can insert them randomly.
2. Using a URL builder tool
The easiest way to embed UTM parameters is by using URL builder tool. There are so many tools available online but I would suggest the three popular and widely used tools.
1. Google Campaign URL Builder
This is the most widely used URL builder and easy to use. You only need to add the UTM values
in the required fields and it will automatically generate the URL which you can promote via email.
2. UTM.io
This is another great URL builder which does not just add UTM parameters but also shortens the URLs while retaining the UTM tags. You can also use this tool for simple URL shorten purpose.
3. Online UTM Tracking Code Builder
This is yet another most favorable and popular tool used for generating URLs with UTM tags.
3. Viewing email reports in google analytics
Once you are done with embedding UTM tags and running email campaigns, the final step is to view email reports in google analytics. To do this, you can use two ways.
1. Create an advanced segment
This is a much easier way to isolate the email traffic from the whole data and analyze it separately. To do this, create a new advanced segment and from the traffic source column, enter the medium as email.
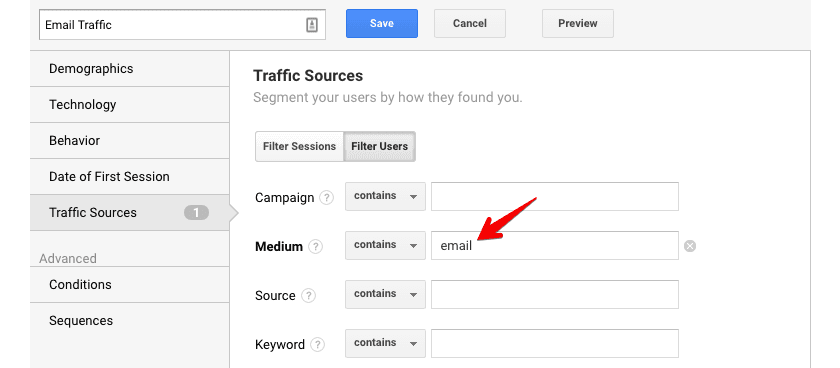
create advanced segment
Enter the segment name and click save. If you want to isolate and analyze a specific email campaign, enter the campaign name in the campaign field.
2. View traffic through channels
The second way to view email reports in google analytics is by navigating to Acquisition >> All Traffic >> Channels and clicking on email.
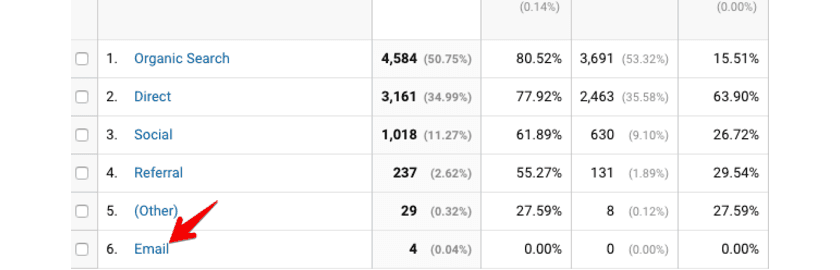
google analytics email reports
Email Campaign metrics to measure in google analytics
Before sending out emails, you should know the goal of your email campaigns. The goal of your email campaign can be driving more traffic to your site or generating more leads. To measure the success of your marketing campaign effectiveness, in this case, your email marketing campaigns, you need to measure few important metrics.
1. Calculate Click Through Rate for Email
Click through rate is the percentage of email recipients who clicked one or more links in the email.
In google analytics, we are going to calculate CTR for each campaign. The information you would require will be the number of emails sent and date on which the campaign was started. Follow the steps below:
Step 1: Select the date range from the time you started the specific campaign.
step 2: View the number of unique pageviews for each campaign (Behavior >> Site Content>> All Pages)
Step 2: Add the secondary dimension as Campaign to the email reports.
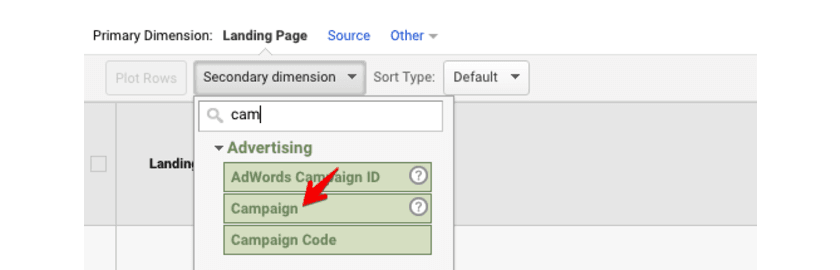
filter reports
Step 3: Apply advanced filter to view the specific email campaign.

filter reports
Now you can get the number of unique pageviews for the specific campaign.
To calculate the CTR for this campaign apply the formula: (Number of Unique pageviews / Number of delivered emails) * 100.
Example: (45 unique pageviews / 500 emails delivered) * 100 = 9% CTR
2. Calculate Conversion Rate for Email
The conversion rate is the percentage of email visitors who completed a specific action on your site.
For accomplishing this, you have to track the actions in your google analytics account. The actions might be a pdf download or filling a contact us form.
The first step for calculating conversion rate for email would be setting up goals for the specific actions you want to track.
Next, we will calculate the number of email visitors who completed the goals.
Step 1: Create an advanced segment in google analytics.
Step 2: From the traffic source column, set the Medium as email and set the condition as shown in the below image.
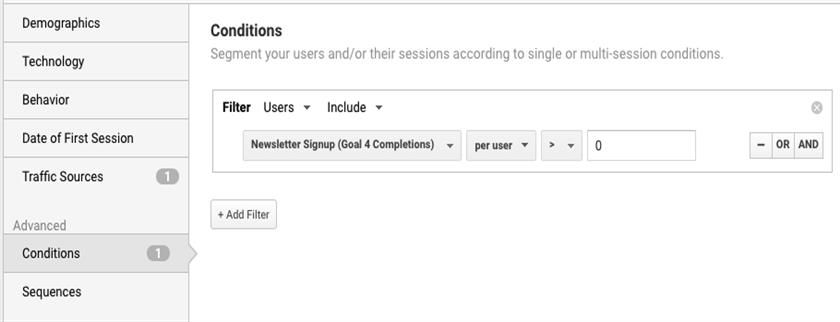
conditional segments
Note: Make sure to apply the filter on user level.
Now you get the number of email visitors who completed a goal on your site.
Apply this formula to calculate the conversion rate:
CR = (Number for users who completed goals / total emails sent) * 100
Example: (14 users completed goal / 500 emails sent ) * 100 = 2.8% CR
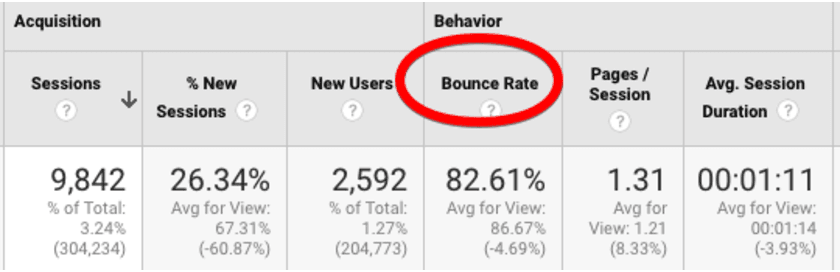
3. Calculate Bounce Rate for Email
To check the bounce rate for your email visitors, simply open the email reports(Acquisition >> All Traffic >> Channels) and check the bounce rate row.
check bounce rate
If you want to check bounce rate for specific email campaigns, add secondary dimension as campaign and apply an advanced filter to view reports for the specific campaign.
So far, you should now be able to see email reports in google analytics. If you still have confusions about google analytics email tracking, let me know in the comments.